My Postpartum Enemy (Part 3): Finally Fixed!

To read Part 1 of the story, click here.

My abs were split apart for about 6 and a half years, starting with pregnancy #1 and getting worse with #2 and #3. I did everything in my power to repair the damage without surgery, but it just wasn’t enough. After more than two years of focused abdominal training, my abs were still split apart by 2.5 to 3 inches. Surgery got me the rest of the way there, and I am now finally…FINALLY…fixed. My muscles are back where they are supposed to be. My umbilical hernia is repaired.

It is quite surreal. I am so utterly thankful.

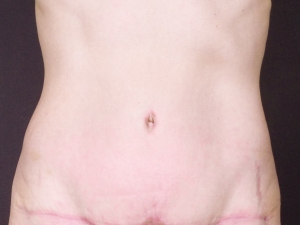
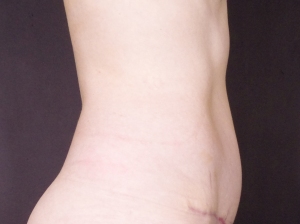
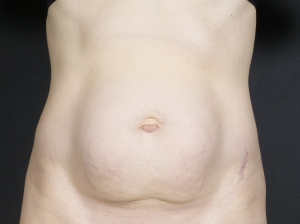
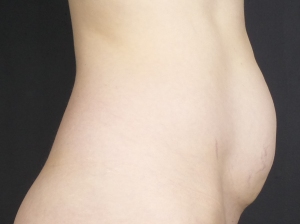
Here are the official BEFORE photos. These were taken about 4 months before the surgery. So these are after two years of ab workouts, doing exercises that were supposed to repair this condition (diastasis recti). The split used to be way worse, but I did not have the heart to take photos of what I looked like right after baby #3 was born. These are my “as good as I could get it through exercise” photos.

BEFORE

BEFORE

PatientFile_2560480-1

BEFORE


And here are the AFTER photos, taken 5 months after surgery. I still have a little bit of swelling, but that’s normal.

PatientFile_3889375-1

AFTER (5 months post-op)

PatientFile_3889376-3

AFTER (5 months post-op)


Recovery hurt like hell. And I have a high tolerance for pain. I had completely unmedicated deliveries with all three of my babies. But I was very thankful for the pain meds they gave me for this surgery. Holy cow. For three days, I only got out of bed to go to the bathroom, and even that was exhausting. I laughed at something on day #2–just enough to engage my ab muscles–and it hurt so bad I cried. Any little cough was excruciating. After those first three days, each day got a little bit easier. What a difference one week makes!!! It was about a month before I could actually stand up straight again. You can’t put tension on the incision (hip-to-hip) while it’s healing, and the ab muscles are full of stitches. So for a couple weeks I had to walk hunched over, which put a lot of strain on my back, so my back was killing me.

It was TOTALLY worth it. I would even call it life-changing.

All in all, I had at least 200 stitches in me…about 60 or so permanent stitches holding my abs together, another 30 or so dissolvable stitches to bind the skin back to the abs after repairing the muscles, another 90 or so to close the hip-to-hip incision, plus more to fix my belly button. Phew! That’s a lot of stitches!

The surgeon told me that the gap between my ab muscles was “really big….about 2.5 to 3 inches wide.” Wow! I thought that I had been closing the gap with my ab exercises, since I had actually shrunken the pooch somewhat, but now that I know they were still split that far apart, I have a different theory. I had been focusing on exercises to strengthen the transverse abdominis (inner abs), since that’s what my research had pointed me to. The exercises definitely shrunk the poochiness of my torso, and I couldn’t feel the gap as badly as I could previously. But now that I know the gap was still so wide, I’m thinking that those inner abs just got better at holding my guts in so they weren’t pushing outward on that weakened connective tissue and making the gap more pronounced….rather than actually healing the gap. That’s my theory. If you’re in the medical field and can comment on that, please give me your insight!

The surgeon also said my ab muscles were really strong and thick, so that made me feel good 🙂

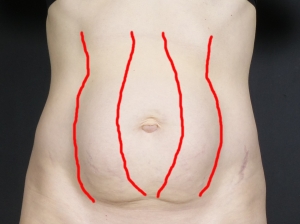
To give a little perspective, here are some visuals to illustrate my problem – diastasis recti:

Print

approximate location of my abs before surgery

approximate location of my abs before surgery

My surgeon was Dr. Melinda Haws and I HIGHLY recommend her. She did a fabulous job and was really personable as well. If you’re in the Nashville area and are looking into this kind of surgery. Definitely check her out.

If you have any questions for me, please leave me a comment. I’d be happy to dialogue with you.


Brighten Your Subjects with Photography Reflectors

reflector setI do child and family portrait photography. One of the tools in my gear bag is a set of reflectors…basically discs you can
use to reflect light onto your subjects. On a recent photo shoot, I took a photo of my subject and then added the reflector and took more shots. My husband was amazed at the difference the reflector made and made me promise to write this blogpost 🙂 So here it is…

It was overcast the day of the photo shoot. Overcast skies give nice soft even light on your subjects but can also create weird shadows on their faces. You can use a reflector to reflect more light onto your subjects’ faces and fill in those shadows.

This first photo is my unedited image without the reflector. Do you see all the shadows on his face?

BEFORE

BEFORE REFLECTOR (UNEDITED)

This next photo is my unedited image after I added the reflector to shine more light on his face:

AFTER

AFTER REFLECTOR (UNEDITED)

And here is the final product – the edited image:

FINAL EDITED IMAGE

FINAL EDITED IMAGE

Reflectors can be a very budget-friendly addition to your photography tools. Here’s a link to the set I got on Amazon for under $20.

That’s all, folks! For more information on how to use reflectors, here’s a helpful post at digital-photography-school.com.

You can check out my personal photography website at www.cstokes.photography. If you need some updated family photos and you’re in the Nashville area, give me a call or shoot me an email (contact info on my website). I’d love to meet you!

My Postpartum Enemy: Diastasis Recti (Part 2)

My postpartum enemy is diastasis recti – abdominal split. It has been a long, difficult, emotional journey.diastasis-recti-2

To read Part 1 of the story (written almost 2.5 years prior to this post), click here.

Picking up where Part 1 left off……    Baby #3 was born August 21, 2013. I bought an abdominal splint to try and help heal my abdominal split more quickly, but it was so cumbersome, particularly with breastfeeding, that I gave up on using it after quite a short time.

I worked on ab exercises as best I could, considering I had a newborn plus two other small children, through the end of the year (about 4 months). Then it went out the window for a few months because I got pneumonia, we took an 11-day road trip, and I just got out of the routine. Plus…I was getting discouraged.

Finally got back on the wagon and went to a physical therapist March 28, 2014. (Baby #3 was 7 months old.) Over the course of 2.5 weeks, I met with her three times, and I’m so glad I did. I showed her the exercises I had been doing and she had major corrections for me. She told me that when I was contracting my abs, they were pushing out rather than pulling in. “I’m not even sure how you’re doing that,” she said. We had to re-train my muscles to go the right way. It took a whole lot of mental effort to make that happen. Once we got that straight, she set me on a course for strengthening and toning all the muscles.

When I asked her about a time frame in which I could get the results I wanted (a nice flat stomach) she told me that the muscles would respond fairly quickly to the exercises, but the connective tissue takes much longer to heal. The connective tissue is what holds the two sides of the abs together and is a big part of the problem. Sadly, she said it would take 6-12 months for the connective tissue to heal. Bleh! Not what I wanted to hear, BUT at least that helped set realistic expectations for me so I wouldn’t work on it a few months and be once again discouraged and disappointed.

So I kept at it for months and months and months.The roller coaster of emotions continued. Hope, then discouragement, then renewed hope, then more discouragement. Progress was ridiculously slow. I did see improvement, but nowhere near enough.

When baby #3 turned two (August 2015), I finally decided to set up consultations with a couple surgeons to get an assessment of my abdomen and see about fixing the muscles surgically (getting them sewn back together). After talking with two different surgeons, I felt so validated and encouraged. They told me that my abs were still split (about a 6-inch split) and that no amount of exercise was going to bring them the rest of the way back together. I had done all I could do. They said I was really fit and the remaining pooch was just due to muscle damage. A little bit of extra skin, but mostly muscle damage. Oh…and I found out I have an umbilical hernia, which is why my belly button has turned into an outie instead of an innie.

It ended up being a very emotionally healing experience just to talk to the surgeons. To finally talk to someone who knew what they were talking about and could tell me exactly what was going on with my abdomen, in contrast to all the people who just kept telling me I needed to eat less and exercise more to get rid of the pooch. When you’re working your butt off and people tell you you’re obviously not doing enough (or ask you if you’re pregnant), it’s very disheartening. I wondered what was wrong with me. Why I couldn’t fix it. I was working so hard.

I can finally see the light at the end of the tunnel. I’m going to have the surgery. Though I will be left with a hip-to-hip scar, it will be well worth it to finally be rid of the pooch, have my muscles back in the right place, and no longer look pregnant.

I really wanted to share this story to bring awareness on this subject. I think a lot of women experience the same shame, frustration and hopelessness that I have felt and don’t even realize what they’re up against. They just think they haven’t done enough to get back in shape and beat themselves up over it. Spread the word! More people need to know about diastasis recti.

To be clear, many people will be able to get great results on healing their split by doing the right exercises. I made a lot of progress, but just couldn’t get all the way there. Surgery is going to complete the process for me, but I’m not saying that surgery is for everyone.

For Part 3 of the story, including before and after pics, click here.

Backyard Chalkboard (DIY)

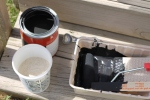
IMG_2798I wanted to make our backyard more fun and inviting so that my kids would want to play there. I came across an idea for a backyard chalkboard in a blogpost somewhere and decided I wanted to give that a whirl.

As I started getting into the details of how to do it, I found one big problem: chalkboard paint is for interior use. I found one company that sells exterior chalkboard paint but it’s $40/quart. Other people tried/suggested using plain old flat black exterior paint. But then Martha Stewart came to the rescue and offered up a recipe for mixing your own custom chalkboard paint, so I was off and running.

You surely would have laughed watching me on my trip to Home Depot to get the supplies. Yes, I managed to get the plywood down onto a cart and up to the register by myself, but it was quite difficult 🙂 But I digress…

Here are the materials I used:

  • 4′ x 8′ piece of plywood (I chose sanded pine 15/32″ thick, because it felt sufficiently heavy duty and was sanded pretty smoothly on one side) $27
  • one quart exterior latex primer, tinted gray (this was enough for one coat on each side of the board) $11
  • two quarts exterior flat-finish black latex paint (this was enough for two coats on each side of the board) $24
  • 1 pound unsanded tile grout $5
  • 4-inch high-density foam roller $5
  • mixing container (I used a plastic cup)
  • paint stirrer
  • 150-grit sandpaper (had some laying around)IMG_2414
  • one box 3-inch exterior screws $9

I did one coat of primer on both sides of the plywood. (Gotta paint the back of the board so your chalkboard doesn’t rot!) Then I did two coats of paint on both sides of the board.

IMG_2417I mixed 1 cup of chalkboard paint at a time. Pour 1 cup of paint into the mixing container and add 2 tablespoons of unsanded tile grout powder. Stir well with a paint stirrer, breaking up any clumps. Paint the board with the foam roller, making sure to get good even coverage. Remember to paint the edges of the board. Let dry and do a second coat. (For the back of the board, I used the paint straight without the grout powder.)

IMG_2416When the second coat is dry, sand the front of the board with 150-grit sandpaper for a nice smooth finish. Wipe off the dust. Voila!

You’re ready to attach the chalkboard to the fence. Use 3-inch exterior screws to screw the board into the fence posts on each end of the board. You may want to also use some smaller screws and some shims if necessary to add more support points in the middle of the board. IMG_2415We didn’t. Hubby used three screws on each end of the board and it seems really secure.

You could add a frame around the board, but for simplicity’s sake, I did not.

I’m excited about this new addition to our yard 🙂 I think it will be fun to incorporate it into homeschooling lessons as well. I’ll be starting the homeschool journey this fall with my oldest doing kindergarten.

IMG_2799

Eating Clean without Breaking the Bank

Over the last few years, we have made a lot of changes to our diet. These changes include moving from commercial meats to grass-fed/pastured/local meats, from farm-raised seafood to wild-caught seafood, from conventional eggs to pastured soy-free eggs, from conventional to organic fruits and vegetables, from conventional milk to raw grass-fed milk, etc. All of these changes meant that we had to keep expanding our grocery budget.

saving-money-piggy-bankI feel like I’m finally making progress and getting the grocery budget back under control. We’re still spending more than we used to, but we’ve reined it back in a good amount. I wanted to write this post to offer up our experience so that maybe someone else can learn a thing or two to help get their costs down as well. I’ll skip going into the reasons for our various dietary changes, as that would be well beyond the scope of this post. Without further ado, here are some of the things we’ve done to get our grocery spending down:

1. Meat CSA (Community Supported Agriculture). Grass-fed/pastured meats can be a huge expense. We get our meats from a local farm through their CSA program. We pay for 6 months of meat at a time and then pick up our share (20-22 pounds of meat) each month. Since we’re buying in bulk, the farm can offer us a discounted price. We pay about $5.50/pound for a mix of chicken, beef and pork (and tiny bit of lamb and goat). For grass-fed/pastured meats, that’s a pretty great price. In case you’re wondering what kind of meat cuts we get, our monthly share always includes two whole chickens, three pounds of ground beef and miscellaneous other cuts like roasts, steaks, sausage, etc.

2. Veggie CSA. We also started getting our vegetables from a local farm through their CSA program. We pay a lump-sum at the beginning of the season and then pick up our weekly share (approximately 3/8 of a bushel or about 3 gallons). The veggies (plus some melons and berries) are grown organically and the cost comes out to about $16/week. Again, that’s quite a bit of organic produce for that price. I’d link to their website, but they don’t have one. If you’re in the Nashville area and want more info, you can email them at eco-gardenscsa@bellsouth.net.

3. Bulk co-op. We get various dry goods and produce items through a bulk co-op. Basically, people in our local area place orders and then a truck comes once a month or so and drops off all the orders at a drop-off point. You can get things like 25-pound or 50-pound bags of grains, flour, or dry beans; seasonal produce by the bushel (a bushel is about the size of one apple box); raw nuts; etc. Some of the things I have purchased this way are: organic wheat and spelt berries (to grind into flour), organic rolled oats (I make homemade granola cereal, so we go through lots of oats), organic raisins, organic barley, organic dry white beans, raw almonds, rapadura sugar, peaches and lots of apples. If the quantities are too large for you to manage, perhaps you could split some items with a friend.

4. Making as much as I can from scratch. First and foremost, learn how to make meals from scratch. Then add to your repertoire and learn how to make your own chicken stock, beef stock, yogurt, pickles, sauces, drinks, granola, bread, muffins, pancakes, waffles, tortillas, pita bread, salad dressing, snacks, beef jerky, ice cream, popsicles, hot chocolate, smoothies, trail mix, dips, nut butters, etc. Buy as few pre-packaged things as possible, which will not only cut your costs but also help you eat healthier by avoiding food additives, conditioners, colorings, flavorings, preservatives, anti-caking agents, MSG, high fructose corn syrup, partially hydrogenated oils, etc.

5. Price comparison shopping. I had been making mental notes of what was cheapest to buy where. I finally put in the extra effort to make an actual spreadsheet and definitively see what I should be buying where. (Call me a nerd if you must. I won’t be offended.) I put various store names across the top of the sheet and various items down the left side of the sheet. To compare apples to apples, as they say, I broke all the prices down into the price per 16 ounces. That is, if the item was $2 but came in a 2-pound package, I would list the price as $1. Then it was really easy to see which store had the best price. I organized the list so that all the items that a particular store had the best price on would be grouped together and then made a list to post on my fridge. Keep in mind, you don’t want to make yourself crazy with going to too many different stores. From my comparison spreadsheet, I made a shopping list for Trader Joe’s, Costco and Whole Foods (plus the Bulk Natural Foods co-op), because I get enough things at good prices at those stores to make it worthwhile to do a once-a-month (or so) trip in addition to my regular weekly shopping at WalMart. I have the list posted on my fridge and whenever I go to one of those stores, I check the list to see which items I need to get while I’m there. Note: the majority of the items I get at Whole Foods are from their bulk bins, as those are their items with the best prices. Whole Foods is nicknamed Whole Paycheck for a reason 🙂 I uploaded a copy of my spreadsheet in its current state as of January 27, 2014. It is by no means comprehensive, but it works for me and I keep adding to it. Click the version you want: Price Comparison Excel version OR Price Comparison PDF version.

6. Costco. Costco has been carrying more and more organic/healthy items. Yes, there’s an annual membership fee of $55, but it is definitely worth it for us. I’ve done the math. Some of the items I get from Costco are: organic produce, wild-caught seafood, grass-fed butter, organic coconut oil and raw nuts. They also generally have a great price on gas, by the way, as well as plenty of other non-food items that don’t relate to this post.

7. Eating less meat. My husband and I used to be very heavy meat-eaters.  When we made the switch to higher-quality meat, we traded quantity for quality. In other words, less meat but better quality. Instead of meat being the star of each meal, I’ve worked really hard to use meat more often as one component of the meal. For example, a stir fry of meat and veggies over rice, rather than straight chicken breasts. Some of our meals are heavier on meat, but I’ve worked hard to add lots of recipes to my recipe box that use less meat or no meat at all.

8. Using the “Clean Fifteen” and “Dirty Dozen” guidelines. The Environmental Working Group publishes a Shopper’s Guide to Pesticides to show which fruits and vegetables have the most pesticide residues. The Clean Fifteen have the least pesticides, and the Dirty Dozen have the most pesticides. If you’re trying to keep your costs down, you can focus on buying the Dirty Dozen items organic and go ahead and buy conventional (non-organic) for the Clean Fifteen items. Click here for the complete list. Or, click here for just the Clean Fifteen / Dirty Dozen.

9. Putting my freezer to work. This is both a time-saver and a cost-cutter. I’ll make a bigger batch than what I need of soup, beans, etc. Then I freeze the rest. Now I have a meal or a component of a meal ready to go in the freezer for later. If I haven’t made it to the grocery store and we’re running low on food, I have the option to pull something out of the freezer rather than going out to eat or resorting to something pre-packaged (or trying to squeeze in a trip to the grocery store AND make dinner). I also buy more of what’s in season (e.g. pumpkin, apples), since in-season produce is much cheaper, and freeze it for later. You can also learn how to do canning, but I haven’t done that myself.

10. Price-matching. As I mentioned above, I get some of our groceries at WalMart, and they do price-matching. Other stores may have similar policies. I can typically find an advertised produce deal or two from other stores’ ads and get WalMart to match the price. It must match exactly for this to work. For example, if the ad says, “Oranges 40 cents per pound,” that will work because WalMart sells oranges by the pound. If the ad says, “Oranges two-pound bag for 80 cents” but WalMart doesn’t have oranges in two-pound bags, then that is not going to work. Also, other stores may not price-match, but they’ll accept competitors’ store coupons.

11. Meal planning and not wasting food. A great way to save on your groceries is to plan out your meals. I plan a week of meals at a time, make a list of the things I need to buy for those meals, and stick to my list at the grocery store. Impulse buys add up and can push you over budget. Also, eat all your leftovers from each meal. I’ve heard that the average family throws away about 25% of the food they buy. What a waste! I typically aim to cook enough dinner so that we’ll have enough leftovers for lunch (or at least part of lunch) the next day. Saves time on cooking, and we are planning to eat our leftovers that way. Another option would be to save up all the leftovers from several days and make a dinner buffet one night to use up all the leftovers. The less food you throw away, the more you can save on your grocery bill.

By the way, you may have noticed that I did not include coupons in this list. I do use some coupons, but way fewer than I used to. Why? There aren’t too many coupons for meat and produce.

If this list seems overwhelming, remember that we’ve made these changes incrementally over the last several years. Pick one or two things to start with and go from there. Baby steps 🙂

Do you have your own tips to add to this list? Leave it in the comments!
To Those Who Knew Me in High School: An Apology

IMG

Me at 16

High school was a long, long time ago. I graduated back in 1996. I have many fond memories of friends and experiences. I also look back and wish I could fix certain things. (Not that I’d really want to relive it. Once was enough.)

To those of you that knew me back then….. I apologize.

I was prideful, yet extremely insecure, and handled certain friendships very immaturely. That sounds funny to say, since heck…we were all literally immature at that point. Just teenagers. But now that I’m 34, I have a different perspective than I did at 16.

It took me a long time to realize that I was prideful. All I could see was the insecurity I felt. It finally clicked in my brain when a wise woman in my life explained how people tend to use pride as a defense mechanism for insecurity. Pride is an attempt to make yourself feel more secure. Kind of like putting others down to try and make yourself feel better.

My raging insecurity negatively affected my friendships. I looked to friends for approval and affirmation…especially guy friends, since I felt the most insecure in regard to those relationships.

With the “miracle” of Facebook, I have reconnected (very loosely) with some old friends. It’s fun to get little glimpses into their lives and see where life has taken them. But, of course, it can be difficult to see changes in character just through status updates. I still think of these people, more or less, as they were in high school. I assume that’s how they think of me, as well. After all, I haven’t actually seen hardly anyone from my class of 500+ since graduation.

It’s sad to me that there’s a whole group of people out there that have the 16-year-old version of me imprinted in their memories. Well…specifically the character traits that I’ve worked hard to improve upon, that is.

So if I knew you in high school, please accept my apologies. I’ve changed. I promise. Not like I’m perfect or anything now. Far from it. But I’ve come a long ways from my teenage years, thank goodness.

Anyone else wish they could go back and redo some things from high school?

Cure Tooth Decay…with Nutrition! (Book Highlights)

TeethI recently read a book by Ramiel Nagel called Cure Tooth Decay: Heal and Prevent Cavities with Nutrition. Heal cavities? Really? We’ve probably all heard that if you cut out sugar, you’ll prevent cavities. But when is the last time you went to the dentist and they said you could stop your current cavities by changing your diet? Ummmm….I’m guessing never.

Think about the conventional dental industry for a moment. They make a lot of money filling cavities, doing crowns, and giving root canals. What incentive do they have to tell you that you can stop a cavity in its tracks by changing what you eat? Doubtful they even address that in dental school, but if you’re a dentist…feel free to chime in here. (Same goes for the conventional medical industry. They make a lot of money doing procedures, running tests, etc. They don’t make money educating you about how to live a healthy lifestyle and thus avoid going to the doctor. But that’s a whole other discussion.)

The author points to people groups that eat various traditional diets and describes their well-formed jaws, straight teeth and lack of cavities…and all without modern dentistry/orthodontics. Once individuals from these people groups adopt a “modernized” diet (processed foods, refined sugars, etc. that the typical American eats), again and again their dental health (along with their overall health) spirals downward.

Once you’ve got a cavity, your body won’t be able to fill the hole back in, but you can stop the cavity from progressing and the tooth can re-harden around the spot. This process is called remineralization. You need to provide your body with the right nutrients in order for that to happen, though, and the standard American diet (aka SAD) just isn’t going to cut it.

Dentist Melvin Page spent 30 years researching the biochemical cause of tooth decay. He concluded that tooth decay and gum disease are caused by a disturbance in the ratio of calcium to phosphorus in the blood. “A ratio of 8.75mg of calcium per 100cc of blood, and 3.5mg of phosphorus per 100cc of blood, with normal blood sugar levels, creates immunity to tooth decay. The healthy blood sugar level is 85 milligrams per 100cc of blood. When there are blood sugar spikes, minerals like calcium are pulled from our bones….resulting in tooth decay or gum disease or both.” (p. 28) Eating white sugar produces the most significant blood sugar spikes.

(On a side note, a dental hygienist told me once that some people just seemed immune to cavities and gum disease. Of course, she didn’t know why…)

Vitamins A and D are necessary to maintain that proper ratio of calcium and phosphorus in our blood. Our bodies need vitamins A and D to produce osteocalcin, the protein responsible for depositing calcium and phosphorus into our bones. Vitamin A helps our bodies utilize calcium for bone growth/repair, etc.

“Modern diets  are severely lacking in fat-soluble vitamins [A, D, E and K]. To cure cavities many people simply need to add these vitamins back into their diets.” (p.32) To ensure our bodies can metabolize the vitamins properly, we should be getting these vitamins from food-based forms (not synthetic supplements).

The dietary principles in this book agree with lots of other nutritional research I’ve read. If you want all the details, you’ll have to read the book, but I want to include here some things to incorporate into your diet that will greatly benefit your teeth and help prevent cavities. Some of these foods may be a big stretch from your current diet, but others should be easier to swallow (haha…):

  • fermented cod liver oil supplement (NOT synthetic)
  • high vitamin butter oil supplement (NOT synthetic)
  • herring (I buy cans of smoked herring–sold next to canned salmon and tuna–and even my kids love it)
  • sockeye salmon
  • oysters
  • halibut
  • rainbow trout
  • sardines
  • salmon
  • shrimp
  • eggs (preferably from pastured animals)
  • grass-fed butter (Kerrygold butter is a great option, sold at Costco)
  • grass-fed, raw whole milk (i.e. unpasteurized, non-homogenized; we get our grass-fed raw milk at the farmer’s market in downtown Nashville)
  • liver
  • goat cheese

Note that these are all animal products. You can get beta-carotene from plants/veggies, but that is not true vitamin A. Your body can convert some beta-carotene into vitamin A, but you need the proper fats/enzymes in your system for that conversion to even take place. You would need to eat 10-20 times more carotenes to create the same amount of true vitamin A.

All the seafood on the list should be wild-caught rather than farmed. Farmed seafood has a whole list of problems associated with it (antibiotics, pesticides, feces as food, etc) that I won’t go into here.

Regarding brushing your teeth….  it may not be as important as we’ve all been told. If blood chemistry is what really causes tooth decay, brushing isn’t going to make so much difference. The glycerin in commercial toothpastes can even interfere with remineralization (healing of tooth decay). Rather than tossing brushing aside altogether, however, the author recommends some alternatives for cleaning your teeth like oral irrigation systems (e.g. WaterPik) and herbal tooth powders like this one that my husband and I have started using.

Just think how great it would be to keep your mouth full of healthy teeth by adjusting your diet. Who likes getting cavities drilled? Not me!

dentist_drill

Water Kefir: Probiotics that Taste Like Fruity Soda

100_3775I had never heard of water kefir until Christmas of 2012. My sister-in-law introduced me to it, and it has become a much-loved staple in our house.

Water kefir is a probiotic drink. Basically, fermented sugar water. What’s so great about probiotics? According to the Harvard Medical School Family Health Guide, “clinical studies have established that probiotic therapy can help treat several gastrointestinal ills, delay the development of allergies in children, and treat and prevent vaginal and urinary infections in women. …Gut-dwelling bacteria keep pathogens (harmful microorganisms) in check, aid digestion and nutrient absorption, and contribute to immune function.”

Water kefir is a tasty way to add probiotics to your diet. And it’s even cheap to make. Way less expensive than yogurt or wine and with only a tiny fraction of alcohol (usually significantly less than 1% – source). It’s also dairy-free, so it’s great for those who are lactose-intolerant or allergic to milk.

During the 48-hour fermentation process, about 80% of the sugar gets consumed by the kefir “grains” (a mix of bacteria and yeasts), leaving only about 20% of the sugar in the final product in the form of straight fructose. (Source)

100_3770So how do you make water kefir? You just need water kefir grains, water, a brewing vessel (i.e. glass jar), a container or individual bottles for your finished product, and sugar. For detailed instructions, click here. Basically, though, you put sugar water and your kefir grains in a jar and let it sit on your counter for 48 hours. Then you strain off the water into another container or individual drinking bottles and let it sit for another 24 hours to build up natural carbonation. You can add flavorings either at the beginning or for the second 24-hour process, depending on the flavoring. (You don’t want to damage your kefir grains.) My husband and I love adding lime juice for the second 24-hour process. Tastes like a sparkling limeade.

I got my water kefir grains from my sister-in-law. If you’re in Nashville and would like some grains, just let me know and I can hook you up. (They multiply, so you’ll have extras to give away.) Otherwise, you can purchase them online from stores like Amazon or specialty sites. I bought my 2-liter brewing vessel and some 17-ounce drinking bottles at The Container Store. I use grolsch/wire-top/hermetic/EZ-cap bottles (they go by many names) to maintain the natural carbonation. Update January 2018: I also got some 16-ounce drinking bottles on Amazon awhile ago.

There are tons of different flavoring options, but I haven’t tried too many of them. I tried adding vanilla extract to attempt a cream soda version, but I couldn’t get the vanilla amount to be strong enough to really taste like cream soda without making it too alcohol-flavored. After all, vanilla extract is vanilla bean in alcohol (plus sugar). Lemon/ginger/raisin is good. We just keep going back to lemon or lime, though, because we like them so much. Especially lime.

Update January 2014: We’ve tried a lot more flavor options, so I wanted to add those to this post. I pulled out my juicer and juiced a bunch of different fruits to try as flavors for the kefir. I froze the juice in ice cube trays, then put the cubes in bags in the freezer and defrost a few at a time for the kefir. Watermelon came out great, and let me tell you….one watermelon creates a ton of juice! Orange and strawberry are fantastic. Cantaloupe and honeydew are so-so. Another great one is ginger, which creates a ginger ale type of flavor. Peel and chop/grate a few inches of fresh ginger root and steep it in boiling water. Use some of the ginger water to flavor the kefir.

Have you tried water kefir? Got a favorite flavoring?

Popsicles for Breakfast? Sure!

Want a fun way to do breakfast?100_3728

I made some homemade popsicles using only  homemade yogurt and frozen fruit, and my kids love them. They’ve been asking for them at breakfast. Why not? It’s yogurt with fruit. Typical healthy breakfast fare. And it makes breakfast seem like a treat. Score!

What you need:

  • blender (a food processor might work, but I’ve never tried)
  • popsicle molds (or even an ice cube tray with plastic wrap and toothpicks)
  • plain yogurt (homemade or store-bought)
  • fruit (berries, bananas with or without some cocoa powder, apricots, peaches, etc)

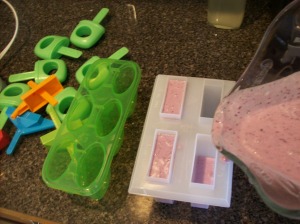
Put yogurt and fruit into the blender and puree til smooth. How much you need depends on the size of your popsicle molds, so you’re just going to have to guess. 100_3706

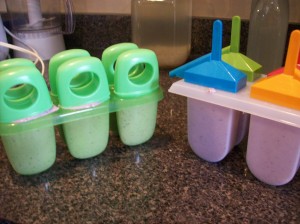
Pour puree into popsicle molds and freeze. To release popsicles from mold, run some water over the outside of the mold. Voila!

100_3711 100_3714

If you’re using an ice cube tray instead of popsicle molds, pour the puree into the ice cube tray. Cover the tray with plastic wrap and poke a toothpick through the plastic wrap into each cube to act as the stick for the mini popsicle. Freeze. Carefully remove plastic wrap and twist ice cube tray to release the popsicle cubes.

Do you have a fun idea for meals? Leave me a comment!

My Postpartum Enemy: Abdominal Split (Diastasis Recti)

I really wanted to wait to write this post until I had a nice “after” picture to show my success–a picture with a nice flat stomach complete with six-pack. However, now I’m 18 weeks pregnant with baby #3, so that won’t be happening anytime soon. Might as well share the first part of the saga now.

100_0161

8 months with #1

Let me back up. I’m a very athletic person. I grew up dancing (ballet/tap/jazz) and have always been in good shape. During my pregnancy with baby #1, I gained 35 pounds (which was more than the 25 I had hoped to stick to). Baby #1 weighed 8 pounds 4 ounces. I jogged and jogged and jogged after he was born to get all the weight off. Took about eight months. Those last 5-10 pounds were very stubborn. (I later figured out that my body just likes to hold onto a few pounds while I’m breastfeeding.) But even with all the weight off, my stomach was not back to normal. It was still…smooshy. So I kept jogging. When baby #1 was 15 months old, I got pregnant with #2 and at least had a reason to look poochy.

100_1129

10 days before due date with #2

100_1128

10 days before due date with #2

With baby #2, I was determined to gain no more than 25 pounds. And I didn’t. Baby #2 weighed 7 pounds 12 ounces. I was determined to get my body back ASAP. I felt huge! My mid-section was a mess. After she was born, I ate a low-fat diet and immediately started jogging again. I was also breastfeeding, as I had done with baby #1. My blood sugar went CRAZY. I tend toward hypoglycemia (low blood sugar), and it was kicking into high gear so to speak. My blood sugar would often get too low and I’d be shaking and breaking into a cold sweat. I even gained a few pounds, to add insult to injury. My baby actually lost weight from one checkup to the next, so her doctor told me to eat more calorie-dense foods…not what I wanted to hear since I was trying to lose the baby weight. I reluctantly gave up jogging as I was forced to accept that my body just couldn’t handle it. That helped a bit with the blood sugar levels at that point. However, later I realized the blood sugar issue was a result of needing more fat in my diet in order for my body to support my normal body function, breastfeeding, and heavy exercise. I basically put my body into emergency mode to hold onto all the fat it could for milk production. You can read more about healthy dietary fat in this post.

People just kept telling me I needed to eat less and exercise more in order to get my body back to normal. NO! NO! NO! Though that may be the answer for some (most?) people, it was definitely not the answer for me.

At that point, I decided that if I couldn’t work on dropping weight, I’d try and work on the muscle tone of my abs, since that was obviously thrashed. So I started doing sit-ups and a few other ab exercises very religiously but with VERY LITTLE results. I hated the way I looked and people asked me fairly often (at least it felt that way) about when I was due or if I was pregnant. Sigh. (Sidenote: NEVER ask a woman if she’s pregnant. All you’re going to do is make her feel fat, even if she is pregnant.)

I felt alone, ashamed, embarrassed and hopeless. What’s wrong with me??? Why can’t I get it together? And every time someone asked me if I was pregnant, it was like a knife to my heart.

When baby #2 was 11 months old, I met with a personal trainer to get professional help fixing my body. He told me that if I could do the workouts 3 times a week, then I should start seeing some good results in a couple months. Hope was restored, and to the gym I went. Faithfully. After a couple months, I definitely saw some improvement (thank goodness!), but not nearly what I had hoped for. I was starting to get some definition on the very upper abs (like a two-pack…ha!) but those lower abs were just stubborn, stubborn, stubborn. Still poochy.

(On a side note…in France, doctors can prescribe and the national health insurance plan actually covers “abdominal re-education”…basically, postpartum physical therapy to help you get your abs back to normal. I learned that when I read Bringing Up Bebe. Hmmm….)

Back to my story. Along the way, my husband kept telling me, “I think something is wrong.” I had several thoughts/reactions to that: 1) That’s just a cop-out; if I work harder and keep at it, eventually I’ll see results (though it’s taking FOREVER). 2) Something is wrong with me for not being able to conquer this issue. 3) My husband doesn’t understand what I’m going through and doesn’t have any confidence in me. 4) If something is physically wrong, what on earth could it be?diastasis-recti-2

When baby #2 was 16 months old (5 months after meeting with the personal trainer), I finally got so desperate from the lack of significant results that I decided to do some research to see if there might actually be something physically wrong with me. I had lost all of the baby weight and my body fat percentage was super-low…yet I still looked pregnant. I had no idea what I was even looking for. I ended up Googling “abdominal pregnancy injury” to see what I could come up with. I ended up finding information on a condition called diastasis recti–aka abdominal split. I had never heard of this, and no one else seems to have heard of this. I think a lot of other people probably struggle with this unknowingly, which is why I really wanted to write this post.

Basically, during pregnancy (or with obesity), your abs can split apart down the middle and after baby is born you are left with a bulging belly and still look pregnant. I read somewhere that 95% of the time, your abs will naturally heal back together after the baby is born. I happen to be one of the lucky 5% that didn’t heal. I did the little test to check if my abs were split and discovered that the gap between the two sides of my abs was 3 fingers wide. Although this was bad news, it almost felt like good news in the sense that I could at least identify the problem. [Update March 21, 2013: After reading the books mentioned at the end of this post, I think the problem is much more widespread than this 5% statistic I read somewhere.]

I was happy to learn there are exercises you can do to help your body heal the split. (Click here and here for some video demos.) So hope was again restored (I had slowly been losing heart), and I started working on those exercises. Unfortunately, I also learned that traditional abdominal exercises (like sit-ups) can make the split worse. ARGH! So I had been killing myself in the gym and potentially making it worse! Somebody shoot me! But you just have to move forward. So I started my new ab routine.

About a month into the new routine, though, I got pregnant with #3 (and therefore once again had a reason to look poochy). It’s been about 5 months since I started the new routine, but there was about a 6-8 week hiatus as we traveled after Thanksgiving and then took a 5-week road trip to California for Christmas. So I’m now 18 weeks (4+ months) pregnant and have been trying to work on the split, knowing that eventually baby #3 will get big enough to make me stop. I finally gave in and stopped working on it about two weeks ago, though I probably should have stopped sooner. I just didn’t want to give up yet. You don’t want to do these exercises and have pressure (such as a baby!) pushing your abs outward. That defeats the purpose. I’ll just have to get back on it after this one is born in August. And though I’ve made a lot of progress on the split, it will probably split back open again with this pregnancy and I’ll lose some or all of the progress I’ve made. But, at least I’ll be starting off from a better place than I would have if I hadn’t done any split repair, and at least I know where to start. Forget the jogging. Fix the abs!

I’ll probably invest in a special splint and/or find a physical therapist experienced with this condition after #3 is born. Surgery is also an option, though one I really want to avoid. Hopefully, I’ll be at a better place emotionally compared to the first two postpartum experiences since I know what I’ll be up against.

Pray for me, if you’re so inclined 🙂

Update March 21, 2013: After posting this, I read two GREAT books on this subject by a registered nurse named Julie Tupler — Lose Your Mummy Tummy (also a DVD) and Maternal Fitness: Preparing for a Healthy Pregnancy, an Easier Labor, and a Quick Recovery. Every mom and mom-to-be should read these books! Tons of great info and exercises for keeping your body in shape before, during and after pregnancy. Hint: Sit-ups are not the answer and may actually CREATE an abdominal split even when there wasn’t one! As it turns out, you can still do ab exercises while pregnant. You can prevent a split, stop a split from getting worse, or even make a split smaller….even while pregnant! Yay! Now I’ve got some new exercises in my tool belt to fight this problem.

To read Part 2 of the story, click here.